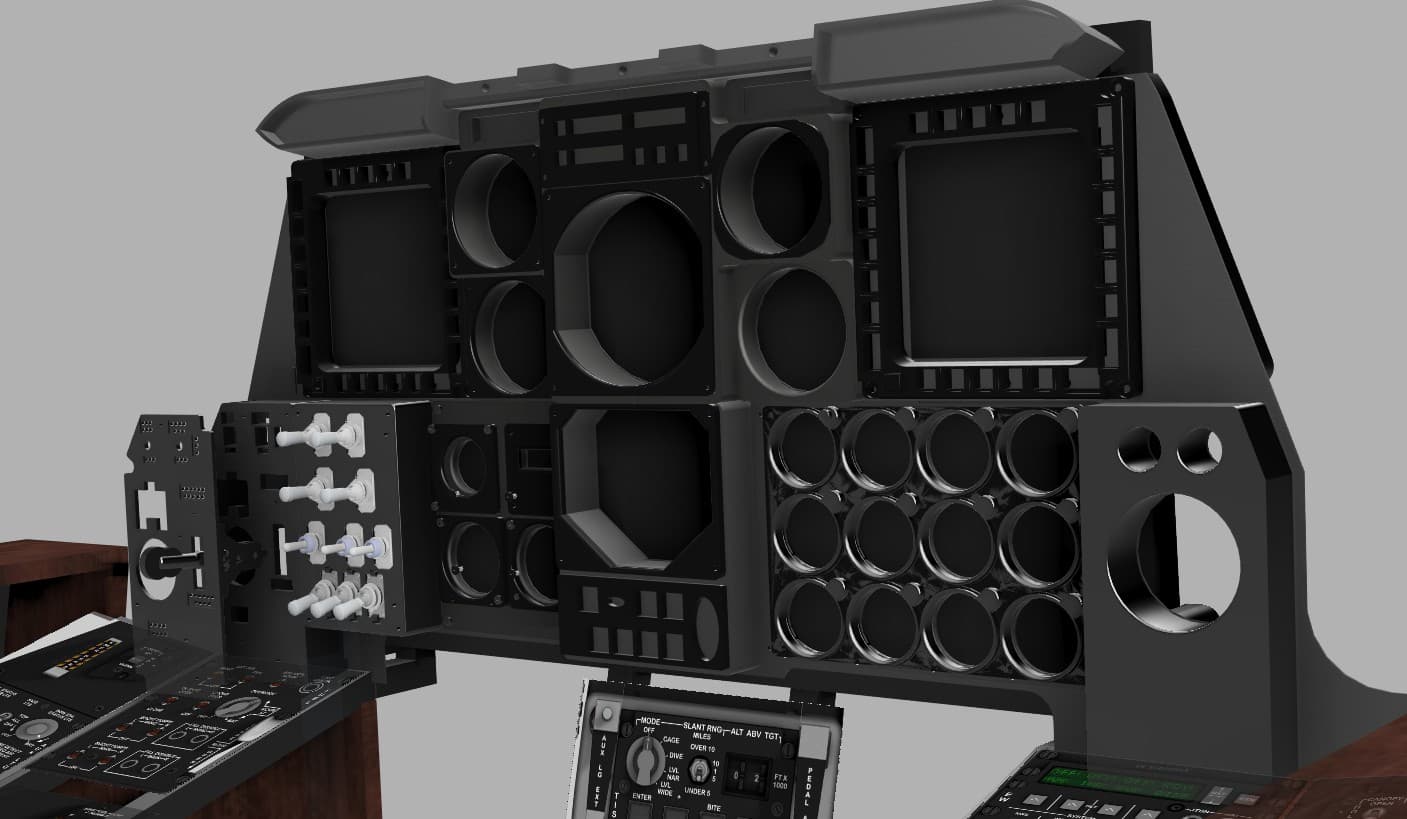
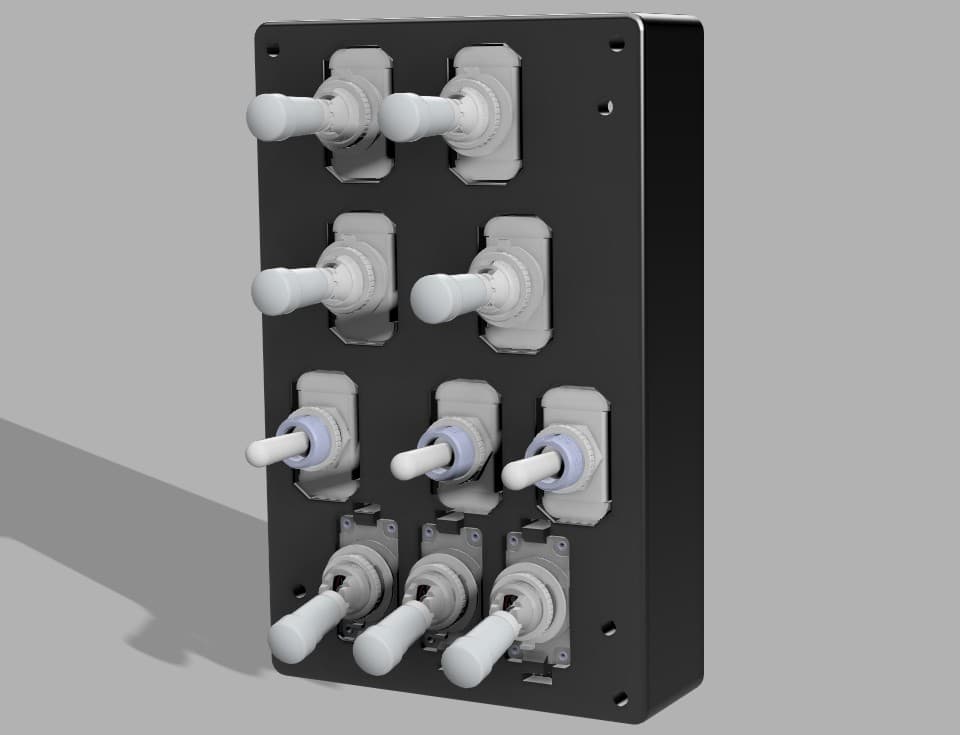
Fairchild Republic A-10 Thunderbolt II
The Fairchild Republic A-10 Thunderbolt II, also widely known by the nickname A-10 Warthog, is a single-seat, twin-turbofan, straight-wing, subsonic attack aircraft developed by Fairchild Republic for the United States Air Force (USAF). In service since 1977, it is named after the Republic P-47 Thunderbolt strike-fighter of World War II, but is instead commonly referred to as the "Warthog" (sometimes simply "Hog").[3] The A-10 was designed to provide close air support (CAS) to ground troops by attacking enemy armored vehicles, tanks, and other ground forces; it is the only production-built aircraft designed solely for CAS to have served with the U.S. Air Force.[4] Its secondary mission is to direct other aircraft in attacks on ground targets, a role called forward air controller (FAC)-airborne; aircraft used primarily in this role are designated OA-10.
Overall Progress
32%Featured Panels
Panels

Canopy Control & Boarding Ladder Panel
Location Upper-right section of the right console, adjacent to the Countermeasure Set Control Panel (CMSP). Purpose Provides mechanical and electrical control of the canopy and pilot boarding ladder, as well as the emergency canopy jettison system. This panel allows normal canopy operation during ground and flight operations, and emergency egress capability in case of damage or power failure. Controls CANOPY OPEN / HOLD / CLOSE Switch — Three-position spring-loaded toggle controlling canopy motor: OPEN: Electrically opens the canopy. HOLD: Stops canopy motion (neutral position). CLOSE: Electrically closes the canopy. Uses a motorized actuator and limit switches for full-range movement. EXTEND BOARDING LADDER Switch (with safety guard) — Two-position switch protected by a pink safety cover: EXTEND: Deploys the boarding ladder (hydraulic assist). RETRACT: Ladder stows back into the fuselage when cover is closed. Safety cover must be lifted to operate. CANOPY JETTISON Handle — Mechanical emergency release handle with yellow/black hazard markings: Pulling handle releases canopy latches via explosive charges or mechanical cable. Used for emergency egress if the electrical canopy control system fails. Recommended hardware (simpit) 1 × 3-position (ON–OFF–ON) toggle switch for canopy control. 1 × guarded 2-position toggle switch for boarding ladder (red or pink cover). 1 × large 3D-printed jettison handle (spring-loaded, momentary type) with safety detent if possible. Optional: motorized canopy actuator simulation using servo or linear actuator for realistic feedback. Construction 3 mm black matte acrylic faceplate, engraved white labels with yellow/black hazard stripe for jettison handle. Boarding ladder guard modeled with separate color overlay for realism. Mount depth: ~25 mm minimum to accommodate wiring and jettison handle movement. Lighting No internal illumination. Relies on indirect cockpit flood lighting. Notes (DCS-BIOS) Fully functional in DCS A-10C. Bindings include: CANOPY_SW (three-position toggle) BOARDING_LADDER_SW (guarded toggle) CANOPY_JETT_HANDLE (momentary jettison) For realism, users can link CANOPY_SW to servo-actuated canopy models or linear motion systems.

Caution Light Panel (CLP)
Location Upper-right section of the right console, directly below the Countermeasure Set Control Panel (CMSP) and beside the Canopy Control Panel. Purpose Provides visual alerts and system status warnings to the pilot for critical aircraft subsystems. Each annunciator light indicates a malfunction or system condition requiring attention. Lights are amber when illuminated, signaling either a fault, configuration warning, or system disablement. Controls Individual Caution Lights (30 total): Each light corresponds to a monitored aircraft subsystem (see label list below). Test Function: All caution lights illuminate during the cockpit “Lamps Test” to verify bulb integrity. Recommended hardware (simpit) 30 × 5 mm amber LEDs or 3 mm SMD LEDs behind a translucent light diffuser. Each LED individually wired to an Arduino or shift register via DCS-BIOS for accurate light mapping. Optional laser-engraved acrylic light plate, dual-layer (black top / translucent amber base). Construction Two-layer panel recommended: Top layer: 3 mm matte black acrylic with engraved legends. Bottom layer: 2 mm frosted or translucent amber acrylic diffuser. Engraving depth ~0.2 mm for uniform light bleed. Individual 10 × 10 mm square cutouts (approx.) for LEDs. Lighting Amber LED illumination for active cautions. Optional white backlight for standby readability. Notes (DCS-BIOS) All lights mapped in DCS-BIOS under CAUTION_LIGHT_PANEL. Typical syntax: DcsBios::LED cautionLightHydL(0xXXXX, 0x01); Each LED index corresponds to a light name in the A-10C export list. A-10C Caution Light Panel — Label Matrix Row A B C D 1 ENG START CYCLE L-HYD PRESS R-HYD PRESS GUN UNSAFE 2 ANTI-SKID L-HYD RES R-HYD RES OXY LOW 3 ELEV DISENG L-AIL TAB R-AIL TAB SEAT NOT ARMED 4 AIL DISENG L-ENG HOT R-ENG HOT BLEED AIR LEAK 5 PITCH SAS L-ENG OIL PRESS R-ENG OIL PRESS SERVICE AIR HOT 6 YAW SAS L-MAIN PUMP R-MAIN PUMP WINDSHIELD HOT 7 GCAS L-WING PUMP R-WING PUMP CICU 8 LASTE L-MAIN FUEL LOW R-MAIN FUEL LOW HARS 9 IFF MODE 4 L-FUEL PRESS R-FUEL PRESS L-R TKS UNEQUAL 10 EAC L-CONV R-CONV NAV 11 STALL SYS L-GEN R-GEN CADC 12 APU GEN — — INST INV

CDU & EGI Power and Navigation Control Panel
Location Right console, mid-lower section — situated below the CDU keypad and adjacent to the Environmental Control panel. Purpose Controls power supply to the CDU (Control Display Unit) and EGI (Embedded GPS/INS), and allows pilot input for navigation mode selection and steerpoint/page management. This panel is critical for flight navigation initialization and waypoint management. Controls Power Section CDU Power Switch (ON/OFF) Activates power to the Control Display Unit. When ON, enables CDU screen and interface for mission data management. EGI Power Switch (ON/OFF) Powers the Embedded GPS/INS (primary navigation system). EGI integrates GPS with inertial reference data to provide position and attitude information to onboard systems. Navigation Section STEER PT Knob (Rotary Selector) RT PLAN – Route plan editing or selection. MARK – Selects markpoints created in-flight. MISSION – Activates mission flight plan points. PAGE Knob (Rotary Selector) POSITION – Displays current aircraft position. STEER – Focuses on current steering waypoint. WAYPT – Allows waypoint review or editing. OTHER – Access to miscellaneous navigation pages. STEER Button (Momentary Push) Cycles through steerpoints or confirms selection. Recommended Hardware (simpit build) 2 × Toggle switches (ON/OFF) for CDU and EGI power. 2 × Rotary switches (3–4 positions) for STEER PT and PAGE selection (3P4T rotary or mechanical encoder if interfaced via Arduino). 1 × Momentary push button for STEER function. Optional: Add LED indicators for CDU and EGI power states. Construction Panel material: 3 mm matte black acrylic, white engraved text. Knobs: Standard 18–20 mm diameter rotaries (can reuse same profile as other A-10C knobs). Mounting depth: 20 mm minimum behind faceplate for rotary clearance. Backlighting: Optional edge-lit green LEDs or diffuse panel backlight. DCS-BIOS Bindings CDU_POWER_SW EGI_POWER_SW STEER_PT_KNOB PAGE_KNOB STEER_BUTTON Real Aircraft Notes The CDU/EGI system initializes the A-10C’s navigation and targeting database. During startup, the pilot powers both systems, aligns the EGI, and uses the CDU panel to confirm INS alignment before flight.

COMPASS / MAG VAR / LAT Control Panel
Location Right console, lower front section — positioned adjacent to the ILS and Lighting Control Panels. Purpose Provides manual and automatic control of the aircraft’s magnetic heading reference system, which synchronizes the Directional Gyro (DG) and Magnetic Slaving Unit (MSU). It allows correction of magnetic variation, adjustment of latitude compensation, and synchronization of heading data displayed on the HSI and other navigation instruments. Controls HDG (Heading Knob) Rotary control: Adjusts the slaved gyro heading reference. Label: “HDG ±” with PUSH TO SYNC function. Push action: Instantly synchronizes the DG with the magnetic sensor (for calibration or manual correction). SYN/IND Indicator Dual-needle display showing the synchronization status between the Directional Gyro and Magnetic Compass. Centered needles: System aligned. Deviation: Indicates slaving error. MAG VAR (Magnetic Variation) Selector 3-position toggle switch: +15, 0, –15 — adjusts system correction for local magnetic declination relative to true north. SLAVE / DG Selector 2-position toggle switch: SLAVE — automatic synchronization between DG and magnetic compass. DG — manual mode for free directional gyro operation. LAT (Latitude) Adjustment Knob Large rotary dial marked in degrees (0–90). Adjusts latitude compensation for the earth’s magnetic dip effect on gyro precession. N / S Selector 2-position toggle switch: Selects hemisphere for magnetic correction (N for northern, S for southern hemisphere). Recommended Hardware (simpit build) 1 × Rotary encoder with push (for HDG + push-to-sync). 1 × Dual analog indicator (or simulated on OLED) for SYN/IND gauge. 3 × Mini toggle switches: MAG VAR, SLAVE/DG, N/S. 1 × Large rotary potentiometer or encoder (for LAT adjustment). Construction Panel material: 3 mm black acrylic with engraved white labeling. Knobs: HDG and LAT: 25 mm diameter with marked index. Switches: mini toggles with silver bat handles. Backlighting: Soft green edge or indirect LED illumination. DCS-BIOS Bindings COMP_HDG_ADJ COMP_SYNC_BTN COMP_SLAVE_DG_SW COMP_MAGVAR_SW COMP_LAT_ADJ COMP_NS_SW Real Aircraft Operation This system ensures accurate heading display by maintaining alignment between the Directional Gyro (DG) and magnetic compass. In SLAVE mode, synchronization is automatic; DG mode allows manual operation in case of slaving unit malfunction or heavy magnetic interference. Typical Procedure: Verify SLAVE mode for normal operation. Adjust MAG VAR and LAT for current geographic region. Use PUSH TO SYNC if compass/gyro drift becomes apparent.

Control Display Unit (CDU)
Location Right console, mid-upper section — positioned below the Electrical Power Control Panel and beside the Oxygen Regulator Panel. Purpose Serves as the primary flight management and navigation interface for the A-10C. The CDU provides full control of the aircraft’s navigation computer, flight plan management, GPS/INS system, and mission data input. It allows the pilot to view, enter, and modify waypoints, routes, coordinates, and system status. Controls Alphanumeric Keypad (A–Z, 0–9) — Used to enter coordinates, waypoints, identifiers, and mission data. Function Keys (SYS, NAV, WP, OSET, FPM, PREV, NEXT) — Navigate CDU pages and access system menus. Data Keys (L1–L6, R1–R6) — Soft keys aligned to on-screen options; correspond to data on the left and right sides of the display. Brightness Controls (DIM / BRT) — Adjust screen backlight intensity. Special Keys: MK: Mark current aircraft position as a waypoint. BCK / CLR: Delete or backspace entries. SPC: Space input. +/–: Toggle data values or scroll lists. Display Monochrome green screen displaying alphanumeric mission and navigation data. Data fields dynamically update from the Embedded GPS/INS (EGI) and Mission Computer. Dimensions: approx. 3.5" active area. Recommended hardware (simpit) Display: 3.5–4.0" LCD screen (800×480) driven by Raspberry Pi or HDMI micro-display. Buttons: 55 tactile switches or 3D-printed keycaps on a custom PCB. Optional: Arduino Mega or dedicated input controller for matrix scanning. Backlighting: Uniform green LED backlight or electroluminescent sheet for authenticity. Construction Panel layers: Top: 3 mm matte black acrylic, laser-engraved. Mid: PCB or button carrier plate. Bottom: Diffuser and light guide sheet. Font: MIL-SPEC Futura Medium Condensed or Eurostile. Display window: Clear acrylic with anti-glare film. Notes (DCS-BIOS) The CDU is one of the most advanced interactive panels in DCS-BIOS: Exposes data for every screen line and button. Uses high-frequency communication (multi-word values). Example binding: DcsBios::Switch2Pos cduNavBtn("CDU_NAV_BTN", PIN); DcsBios::LCDDisplay cduLine1(0x1234, 16); In-Sim Functionality The CDU works in tandem with the Up-Front Controller (UFC) and EGI (Embedded GPS/INS). It is essential for: Flight planning and waypoint management GPS/INS alignment System tests (BIT) Communication with onboard avionics and the Mission Computer

Countermeasure Set Control Panel (CMSP)
Location Top section of the right console, immediately forward of the Canopy Jettison Handle. Purpose Manages the A-10C’s electronic warfare and countermeasure systems, including the AN/ALE-47 dispenser (chaff/flare), AN/ALR-69 Radar Warning Receiver (RWR), AN/ALQ-131/184 jammer pod, and AN/AAR-47 Missile Warning System (MWS). The panel controls system mode, power, and program selection for automatic or semi-automatic threat defense. Controls DISPLAY Screen — Green alphanumeric LED showing system status for: MWS (Missile Warning System) JMR (Jammer) RWR (Radar Warning Receiver) DISP (Countermeasure Dispenser) MODE Knob (OFF / STBY / MAN / SEMI / AUTO) — Sets operating mode: OFF: System powered down. STBY: Warm-up and self-test active. MAN: Manual dispensing only. SEMI: Pilot consent required for automatic dispense. AUTO: Fully automatic threat detection and response. JTSN Knob (BRIGHTNESS) — Adjusts display brightness for visibility under varying cockpit lighting. SYSTEM Switches: NWS (Naval Warning System) — Enables power to the threat detection subsystems. JMR (Jammer) — Controls the ALQ pod’s power and activation. RWR (Radar Warning Receiver) — Activates radar threat detection. DISP (Dispenser) — Arms the ALE-47 countermeasure system for chaff/flare deployment. MENU / ON / OFF Toggle — Accesses setup menu for system programming and BIT (Built-In Test). Four Arrow Keys (▲ ◄ SET ► ▼) — Used for navigating and setting up programs, threat categories, or dispense sequences via the CMSP display. NXT / RTN Buttons — Used for navigating between system pages and returning to the main status screen. Recommended hardware (simpit) 6 × ON-OFF or ON-ON toggle switches (with black caps for authenticity). 1 × 5-position rotary switch (for mode selection). 4 × tactile push buttons (for arrow keys). 2 × small tactile push buttons (for NXT and RTN). Optional small OLED or 16×2 LCD to simulate the CMSP display. Construction 3 mm black matte acrylic faceplate, white engraved legends, green translucent screen window. Mount compatible with backlighting; cutout for display optional for advanced builds. Recommended mounting depth: 25–30 mm to accommodate toggle clearance. Lighting Green backlighting through engraved labels and display window. Can simulate standby glow using low-brightness LEDs behind display glass. Notes (DCS-BIOS) Fully functional in DCS A-10C via DCS-BIOS. Key bindings include: CMSP_MODE_KNOB (rotary positions) CMSP_JMR_TOGGLE, CMSP_RWR_TOGGLE, CMSP_DISP_TOGGLE (individual systems) CMSP_JTSN_BRT (analog brightness) CMSP_NXT_BTN and CMSP_RTN_BTN (navigation) The display output can be captured and replicated on a physical LCD through serial communication for realism.

Electrical Power Control Panel
Location Right console, upper section — positioned below the Canopy Jettison and Caution Light panels. Purpose Controls the main aircraft electrical power systems, including power generation, battery control, and emergency lighting. This panel allows the pilot to manage power distribution between the APU generator, AC generators, battery, and inverter, ensuring stable operation across all flight phases and during engine starts. Controls APU GEN PWR Switch (OFF/RESET) — Controls the Auxiliary Power Unit generator. OFF: Disengages the APU generator. RESET: Resets the generator circuit breaker after a fault trip. AC GEN PWR Switches (L and R, OFF/RESET) — Independently control the left and right main engine-driven AC generators. OFF: Disconnects generator from the electrical bus. RESET: Reconnects generator after fault isolation. INVERTER STBY Switch (OFF / TEST) — Controls and tests the AC inverter that converts DC battery power to AC for essential systems. OFF: Inverter off. TEST: Verifies inverter output operation. BATTERY PWR Switch (OFF / ON) — Enables or disables DC battery power to the aircraft electrical bus. OFF: Disconnects battery from main power bus. ON: Activates battery-powered circuits for startup and backup operation. EMER FLOOD Switch (OFF / ON) — Controls the cockpit’s emergency floodlight circuit, providing illumination in case of total power failure. Recommended hardware (simpit) 3 × 2-position ON–OFF toggle switches for BATTERY PWR, EMER FLOOD, and INVERTER STBY. 3 × guarded or locking toggle switches for APU GEN PWR and AC GEN PWR (L/R) to simulate OFF/RESET behavior. Optional indicator LEDs for generator and battery status feedback. Construction Panel material: 3 mm matte black acrylic, engraved white lettering. Mount depth: ~25 mm to accommodate toggle clearance. Lighting: Indirect cockpit flood illumination only (no internal backlighting). Notes (DCS-BIOS) Fully functional in DCS A-10C: APU_GEN_PWR_SW L_AC_GEN_PWR_SW R_AC_GEN_PWR_SW INVERTER_STBY_SW BATTERY_PWR_SW EMER_FLOOD_SW These bindings allow complete synchronization with in-sim power systems, including realistic start-up sequences and generator reset actions.

Environmental Control Panel
Location Right console, lower mid-section — immediately below the Oxygen Regulator Panel and adjacent to the canopy disengage handle. Purpose Controls the aircraft’s environmental systems, including cabin air conditioning, defogging, temperature control, and pressurization. This panel allows the pilot to manage cockpit comfort and visibility while monitoring cabin pressure and oxygen levels. Controls LIQUID OXYGEN LITERS Gauge — Displays the quantity of liquid oxygen available for the pilot’s oxygen system. OXY IND TEST Button — Tests oxygen indicator functionality by simulating a pressure signal. CLEAR VISION / CANOPY DEFOG Lever: OFF: No airflow directed to the canopy. ON: Directs bleed air for canopy defogging. Positioned forward/backward: Controls airflow volume. WINDSHIELD DEFOG/DEICE Switch (OFF / ON): Activates windshield anti-icing and defog system. WINDSHIELD RAIN REMOVE Switch (OFF / ON): Activates windshield rain removal airflow. PITOT Switch (OFF / ON): Powers pitot tube heat to prevent icing. TEMPR/PRESS (TEMP/PRESS) Selector: NORM: Normal cabin pressurization. DUMP: Depressurizes cabin for emergency or maintenance. RAM: Uses ram air for ventilation (non-pressurized). MAIN AIR SUPPLY Switch (OFF / ON): Enables bleed air supply from engines to environmental systems. CABIN AIR COND (OPR/AUTO): OPER: Manual control. AUTO: Automatic control of environmental system. FLOW LEVEL Knob: Adjusts the amount of airflow to the cockpit. TEMP LEVEL Knob: Adjusts cabin air temperature (COLD ↔ HOT). CABIN PRESS Indicator: Displays cabin altitude and pressure differential (PSI x1000). Recommended hardware (simpit) 5 × 2-position ON–OFF toggle switches (for Pitot, Main Air, Defog, Deice, Rain Remove). 2 × rotary potentiometers (for Temp and Flow knobs). 1 × lever axis or 3D printed handle (for Canopy Defog lever). 1 × analog or servo gauge (for cabin pressure display). Optional LED indicator for OXY TEST simulation. Construction Panel material: 3 mm black matte acrylic with engraved white legends. Lever: Custom 3D printed arm with brass or aluminum knob (~15 mm diameter). Backlighting: Indirect floodlight or edge-lit option for immersion. Notes (DCS-BIOS) Available bindings include: MAIN_AIR_SUPPLY_SW CABIN_TEMP_KNOB CABIN_FLOW_KNOB WINDSHIELD_DEFOG_SW CABIN_PRESS_GAUGE OXY_QTY_GAUGE Real aircraft operation The system uses bleed air from the engines to maintain cockpit temperature, pressure, and visibility. Environmental controls are essential for high-altitude flight comfort and oxygen management. Would you like me to include the 3D printable lever mechanism (for the canopy defog control with realistic resistance and range)? It would fit perfectly into your modular panel design.

Exterior & Interior Lighting Control Panel
Location Right console, lower section — directly below the compass panel and beside the ILS and TACAN panels. Purpose Controls all external and internal lighting systems of the A-10C, including position, formation, and anti-collision lights, as well as instrument, flood, and console lighting. Provides independent brightness and operational control for each lighting group, supporting both day and night operations. Controls External Lights Section (EXT LTS) POSITION FLASH (STEADY / OFF): Selects position light mode. STEADY: Constant illumination. OFF: Turns off navigation position lights. FORMATION (OFF / BRT): Rotary knob controls brightness of formation lights on wingtips and fuselage. ANTI-COLLISION (OFF / ON): Toggles the rotating beacon (strobe) on or off. NOSE ILLUM (OFF / ON): Center toggle switch controlling nose-mounted floodlight for taxiing and ground operations. Interior Lights Section (INTR LTS) ENG INST (OFF–BRT): Rotary knob adjusts illumination of engine instrument panel. AUX INST (OFF–BRT): Rotary knob for auxiliary instrument lighting (miscellaneous right console instruments). FLT INST (OFF–BRT): Rotary knob for main flight instrument backlighting. SIGNAL LTS (DIM / BRT): Two-position toggle controlling indicator light brightness. FLOOD (OFF–BRT / T-STORM): Rotary knob controlling cockpit floodlights. T-STORM: Maximum brightness setting for lightning/storm conditions. CONSOLE (OFF–BRT): Rotary knob controlling console and side panel illumination. ACCEL & COMP (OFF / ON): Controls lighting for the accelerometer and compass indicators. Recommended Hardware (simpit build) 5 × Rotary potentiometers (for ENG INST, AUX INST, FLT INST, FLOOD, CONSOLE). 4 × Toggle switches (for POSITION, SIGNAL LTS, NOSE ILLUM, ACCEL & COMP). 1 × Rotary potentiometer with detent (FORMATION BRT). 1 × Toggle switch (ANTI-COLLISION). Construction Panel material: 3 mm black acrylic with engraved white text. Knobs: 15–20 mm diameter with white pointers. Backlighting: Optional indirect green LED for realism. Layout: Upper section (external), lower section (internal) divided by engraved horizontal line. DCS-BIOS Bindings EXT_POS_FLASH_SW EXT_FORMATION_KNOB EXT_ANTI_COLL_SW EXT_NOSE_ILLUM_SW INT_ENG_INST_KNOB INT_AUX_INST_KNOB INT_FLT_INST_KNOB INT_SIGNAL_LTS_SW INT_FLOOD_KNOB INT_CONSOLE_KNOB INT_ACCEL_COMP_SW Real Aircraft Operation This panel provides full manual control of all cockpit and external lighting systems. It is used by pilots to tailor illumination levels during various mission phases: takeoff, combat, night flight, or landing. Typical Use: Set external lights to STEADY or OFF depending on mission. Adjust formation and anti-collision lights for visibility. Set internal lights for optimal brightness during night ops. Enable T-STORM only during severe weather for maximum cockpit visibility.

ILS (Instrument Landing System) Control Panel
Location Right console, lower section — directly below the TACAN panel and adjacent to the Environmental and Lighting panels. Purpose Controls the Instrument Landing System (ILS) receiver, used for precision approach guidance. The ILS provides localizer (horizontal) and glideslope (vertical) information to aid alignment and descent during instrument approaches. Controls Power Switch PWR (OFF / ON): Rotary switch controls power to the ILS receiver. When ON, activates signal reception and localizer/glideslope indicators on the flight instruments (HSI and ADI). Frequency Display Digital readout (108.10–111.95 MHz): Displays selected ILS frequency. Frequency pairs correspond to VHF localizer and paired UHF glideslope transmitters. Volume Control VOL (Rotary Knob): Adjusts the audio level for the ILS identification tone (Morse code station ID). Recommended Hardware (simpit build) 1 × Rotary switch (for PWR ON/OFF). 1 × Rotary potentiometer (for volume adjustment). 1 × 7-segment display module or LCD (to show ILS frequency). Optional: LED indicator to show power status. Construction Panel material: 3 mm matte black acrylic, white laser engraving for text and labels. Display window: Green-tinted acrylic inset (optional). Backlighting: Subtle edge-light or rear LED for night illumination. Knobs: Power: 20 mm pointer knob. Volume: 18 mm round knob. DCS-BIOS Bindings ILS_PWR_SW ILS_FREQ_DISPLAY ILS_VOL_KNOB Real Aircraft Operation The ILS system supplements the navigation suite for instrument approaches. When the ILS power is on and a valid frequency is tuned, the HSI and ADI display deviation bars corresponding to localizer (lateral) and glideslope (vertical) signals. Typical Use Case: Power ON. Tune assigned ILS frequency. Verify Morse ID via audio. Follow HSI/ADI cues for approach.

Oxygen Regulator Panel
Location Right console, mid-section — mounted to the right of the CDU, directly above the Environmental Control Panel. Purpose Controls the pilot’s oxygen delivery system, regulating pressure, flow rate, and oxygen concentration during flight. This system ensures proper oxygen supply at varying altitudes and allows emergency override or test functions when needed. Controls FLOW Indicator (Mechanical or Electronic) — Displays oxygen flow activity during breathing; oscillates with inhalation and exhalation. Flow Adjustment Knob (+ / –) — Adjusts the oxygen flow rate in pressure-demand mode. EMERGENCY / NORMAL / TEST MASK Switch: EMERGENCY: Supplies 100% oxygen at positive pressure for smoke or contamination conditions. NORMAL: Provides automatic oxygen delivery based on cabin altitude. TEST MASK: Verifies oxygen flow through the pilot’s mask during pre-flight checks. SUPPLY Lever (OFF / NORMAL OXYGEN / 100% OXYGEN): OFF: Shuts off oxygen flow to the mask. NORMAL OXYGEN: Standard operation, mixes oxygen with cabin air as needed. 100% OXYGEN: Forces 100% oxygen regardless of altitude. Pressure Gauge: Displays system supply pressure in PSI. Normal reading: ~70–120 PSI when system active. Recommended hardware (simpit) 2 × 3-position toggle switches (ON-ON-ON) for SUPPLY and EMERGENCY/NORMAL/TEST MASK controls. 1 × Rotary potentiometer (10kΩ) for flow adjustment simulation. 1 × Analog gauge (servo-driven or LED bar) for supply pressure simulation. Optional LED indicator to represent oxygen flow activity. Construction Panel thickness: 3 mm matte acrylic, engraved white lettering. Knobs: Custom 3D printed or aluminum, 15–18 mm diameter. Lighting: Dim green or white backlighting via edge-lit acrylic or micro-LEDs. Notes (DCS-BIOS) Bindings for full simulation include: OXY_SUPPLY_LEVER OXY_MODE_SWITCH OXY_PRESS_GAUGE OXY_FLOW_INDICATOR This allows realistic synchronization of oxygen pressure readings, lever positions, and switch states. Real aircraft notes The A-10C uses a diluter-demand oxygen system, automatically adjusting oxygen mix based on cabin altitude, with pressure-demand override for emergency use.

TACAN Control Panel
Location Right console, lower mid-section — located directly below the CDU/EGI Navigation Control Panel. Purpose Controls the Tactical Air Navigation (TACAN) system, which provides bearing and distance to ground-based or airborne beacons for en-route navigation, air-to-air ranging, and formation flight coordination. Controls Channel Selector CHANNEL Display: Digital numeric window showing selected TACAN channel (e.g., 54X). CHAN Selector Knob: Rotates to select the desired channel (1–126). Press to toggle X/Y mode. TEST Section TEST Button: Initiates a system self-test. When pressed, the channel display flashes and signal indicators respond if functional. Red indicator light below illuminates during test sequence. MODE Selector Knob (5-position rotary): OFF: System powered down. REC: Receives TACAN signals only (no transmission). T/R: Standard transmit/receive mode for distance and bearing. A/A REC: Air-to-air receive mode for ranging to another aircraft. A/A T/R: Air-to-air transmit/receive — both aircraft exchange range data. VOLUME Knob (Rotary, continuous): Adjusts audio level of TACAN signal identification tone (Morse code ID). Recommended Hardware (simpit build) 1 × 5-position rotary switch (OFF, REC, T/R, A/A REC, A/A T/R). 1 × Momentary push button (for TEST). 1 × Rotary encoder with push (for CHANNEL selection + X/Y toggle). 1 × Rotary potentiometer (for volume control). Optional: 7-segment display or LCD to show channel number (e.g., via Arduino). Construction Panel material: 3 mm matte black acrylic, white laser-engraved labels. Display window: Transparent acrylic inset with green tint (imitating real electro-luminescent display). Backlighting: Edge-lit green or indirect LED for realism. Knobs: Volume and channel knobs: ~18 mm diameter. Mode selector: ~25 mm diameter with pointer indicator. DCS-BIOS Bindings TACAN_MODE_SW TACAN_CHAN_SELECTOR TACAN_VOL_KNOB TACAN_TEST_BTN TACAN_DISPLAY Real Aircraft Operation The TACAN system provides precise range and bearing to a ground station or cooperating aircraft. The A-10C uses it as part of its navigation redundancy suite, often in combination with EGI and CDU data. Typical Usage: Set the channel and mode to T/R. Verify tone and bearing on HSI. Adjust VOLUME to hear Morse ID for station verification.
Latest Updates


Project Update — Rethinking Panel Design for Everyone
I paused development of the A-10C panels for a moment to focus more deeply on the electronics side of SIMSTRUCT. After all… what is a body without a soul? The front console is essentially complete — all panels are designed, printed, tested, and the fit is extremely accurate. I’m very happy with how the results are shaping up. However, with the arrival of a new batch of toggle switches, it became clear that I’ll need to revisit some parts of the design, especially the mounting geometry on the back panels. This raised an important question about the future direction of SIMSTRUCT: How can I make the A-10C cockpit files and electronics accessible to everyone, regardless of skill level or component availability? Different builders use different hardware, and even small variations in switch dimensions can become barriers to an otherwise simple build. That goes against my vision — which is to make cockpit construction achievable and enjoyable for all. Because of this, I’m now exploring a “one-size-fits-all” approach for panel design. The idea is to create mounting systems and tolerances flexible enough to support a wide range of switches and components without forcing anyone to hunt for specific hardware. And I would love to hear from the community: What challenges have you faced with panel compatibility? What ideas or suggestions do you have for universal mounting systems? Are there components you think should be prioritized for broad compatibility? Thank you all for following the project and supporting each step of this journey. Much more is coming soon — and your feedback will shape it. See you in the next update.

SIMSTRUCT – Front Console Input Board Update!
(A small pause… but for a very good reason!) Hey everyone! I took a short break from modeling the A-10C panels because I needed to lock down something even more important: the electronics heart that will power the entire front dashboard. Sometimes you have to pause the build to keep the ideas fresh — and trust me, this part was worth the pause. Today I’m sharing a sneak peek of the Front Console Input Board, the “brain” that will handle all the switches, toggles, encoders and sensors from the A-10C front panel. No more cable chaos. No more guessing pins. No more fragile protoboards. Just plug, fly, and smile. 😄 What’s working right now Fully integrated ATmega32U4 (native USB) High-density input matrix with 20 shift registers (160+ digital inputs!) Four 50-pin IDC ports for clean, organized panel wiring Built-in filtering, decoupling, and DCS-ready structure Designed from scratch specifically for the A-10C front console And best of all: It will ship with firmware pre-flashed, DCS-BIOS profiles, naming conventions, and calibration already aligned with the A-10C cockpit logic. You plug it in, connect your switches, and your sim suddenly feels alive. Next milestone I’m now beginning development of the output slave board — the board that will handle backlighting, annunciators, caution lights, and other outputs. Once both boards are complete, the entire front console becomes one clean, integrated ecosystem. What’s coming If all goes well, the full A-10C front console set (inputs + outputs + panel files + wiring guides) should be ready for testing in about one month. ✈️ And beyond… A-10C was my first love, so she had to come first But after she’s complete, I’ll be releasing plane-specific electronics for multiple aircraft. Why plane-specific? Because every aircraft deserves its own optimized, precise electronics. No improvisation. No wrestling cables. No guessing pins. Just: ✔️ Plug in your console ✔️ Load your profile ✔️ And fly. Community Support Coming Soon Over the next 2 weeks, I’ll be launching: A Patreon with supporter tiers (behind-the-scenes progress, early access files, exclusive perks) The official SIMSTRUCT website, where you can follow development and access resources, files, instructions, tutorials and more. And in about 3 weeks, I’ll open the Interest List + Pre-Order Pipeline for those who want to secure their spot for the first production run. Your feedback and support mean the world to me — and they help push this project forward faster. I will keep posting Hope you enjoy the preview! Let me know what you think!

Fusion 360 Design
The design of the entire Front Console was made modular following a calibrated photo of the cockpit. A real world dimension was obtained form one panel and applied to the photo, so by proportion all the panels aligned and became at scale with the real console. The design had to take in consideration that an LCD panel will be placed in the back to provide instrument readings via Helios, so the panel could not pass that plane. This obliged me to go slightly away from the real proportion and add some additional depth to it. ( Which it turns out looked good in my opinion and made it bulkier) To facilitate with the electronic assembly, I decided to make it in 4 layers. The first layer was the frame that attaches to the console build structure and to the back panel of the AHCP. The back panel is a 5 mm part that will house the toggle switches. Many trial and errors had to be done in order to find the appropriate tolerances to properly fit the switches in the slots. The next layer comprises of a faceplate that will house the backlighting. I made small 3 mm holes ( With appropriate tolerance) to fit in the LEDs that will shine on the next layer plate. The fourth and last layer is the acrylic decal plate where the labels are engraved (see the fab/laser section for more detail)
Support This Build
Become a member to access exclusive content and full project downloads.
Join as Supporter

